

If a pipe burst, a roof leaked, or a storm pushed water into your home, every hour matters. The first 24 to 48 hours determine whether you’re dealing with a manageable cleanup or a much larger restoration project — and they determine whether mold becomes part of the conversation. The good news is that water damage restoration follows a predictable sequence. You don’t have to do all of it yourself, but understanding the steps helps you make smart decisions while professionals handle the heavy lifting.
Immediate Safety and Source Control

Before anything else: kill the power to the affected area at the breaker box, and verify it’s off with a non-contact voltage tester. Water and electricity are the most dangerous combination in a home, and assuming a breaker is off without testing has gotten people killed. Once power is confirmed off, stop the water source — close the main supply valve, isolate the broken fixture, or cap the failed line. If natural gas might be involved (unusual but possible after structural shifts), shut off the gas at the meter and don’t light anything until the area has been ventilated and inspected.
Put on basic PPE: nitrile gloves, rubber boots, eye protection, and a respirator if you smell anything off (sewage backup, mold, chemicals). Take photos of everything in its current state — for insurance, for the restoration company, and as a record of valve positions and switch states. Catching water damage early is one of the biggest factors in how much it costs to fix; for warning signs you might be missing, see our guide on signs of water damage you should never ignore.
Professional Assessment and Water Category Classification
Once it’s safe, call a certified water damage restoration company. The first thing they’ll do is classify the water by category, because the entire restoration plan depends on it.
Category 1 is clean water — broken supply line, overflowing sink, that kind of thing. Lowest contamination risk, most material is salvageable. Category 2 is “gray water” from washing machines, dishwashers, or aquariums — some contamination, faster timeline. Category 3 is “black water”: sewage, river flooding, anything that’s been sitting more than 48 hours. Highest contamination, biggest disposal requirements, most aggressive removal protocols. The category drives everything that follows: which materials get saved, what protective gear crews wear, how the waste is disposed of, and what your insurance will cover. Document everything during this phase — insurance companies want detailed evidence of water source, affected materials, contamination level, and timeline.
Moisture Mapping and Structural Inspection
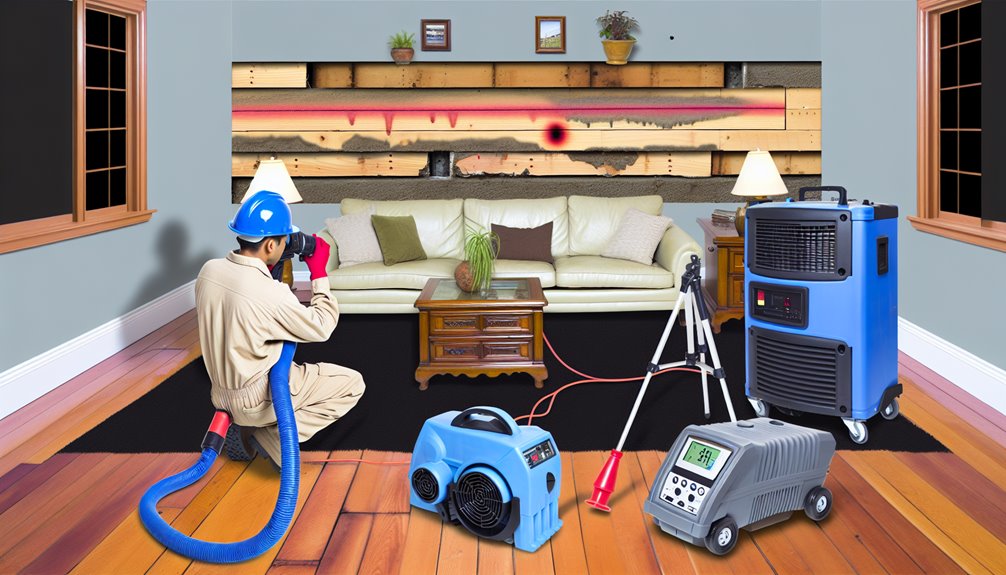
This step is invisible to most homeowners, but it’s where pros earn their fee. Water doesn’t stay where it spilled. It travels through walls, under flooring, through ceiling cavities, and into spaces you can’t see. If you only treat the visible damage, the hidden moisture becomes mold within weeks.
Restoration crews use thermal imaging cameras to spot temperature differences (wet materials read cooler than dry ones) and moisture meters to confirm actual readings. They’ll check the bottom plates of walls, subfloors under any wet flooring, and the cavities behind appliances and cabinets. The result is a moisture map showing exactly what got wet and how far the water traveled — and that map guides every decision in the rest of the restoration.
Rapid Water Extraction Techniques
With the affected area mapped, extraction needs to happen fast. Every hour standing water sits in your home, more is being absorbed into wood, drywall, and insulation. Pros use industrial pumps for standing water, then high-vacuum extractors for what’s soaked into surfaces. On carpet, a weighted extraction wand pulls water out from below the surface — a regular shop-vac doesn’t have the suction to do this effectively.
A good crew works in systematic passes (north-south, then east-west) and keeps extracting until almost nothing more comes out. They document gallons recovered for the insurance file. Some companies use truck-mounted extractors for continuous removal, which moves significantly more water than portable equipment.
Removal of Unsalvageable Materials and Content Protection
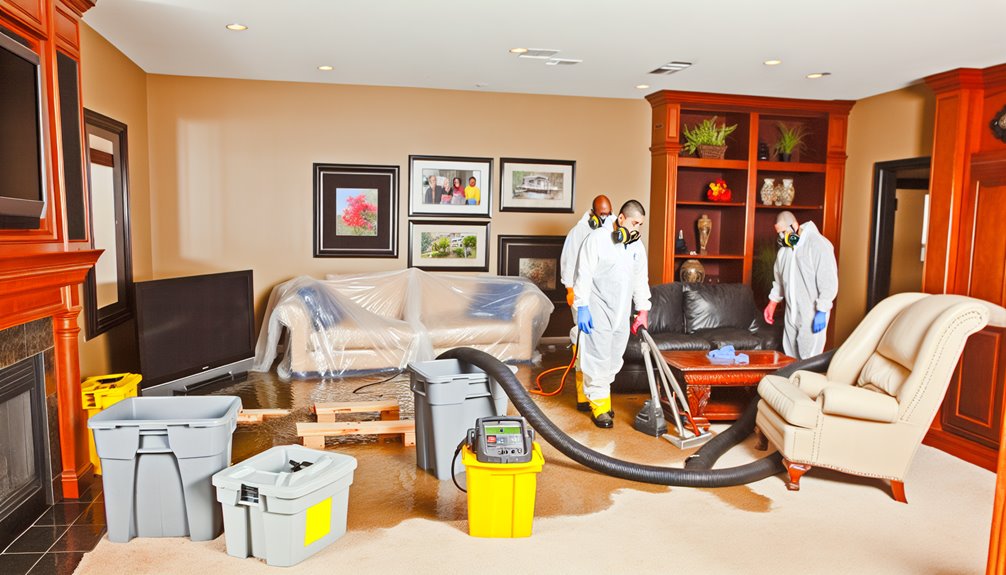
Not everything wet can be saved. Drywall that’s been soaked usually has to come out — it loses structural integrity and becomes a mold breeding ground. Carpet pad almost never survives Category 2 or 3 water. Insulation that’s been wet typically can’t be effectively dried inside a wall cavity. Particleboard furniture and MDF rarely come back. The decision to remove versus save isn’t emotional; it’s based on the water category, how long material was wet, and how porous it is.
While unsalvageable materials are coming out, your contents (furniture, electronics, personal items) need protection. Anything important should be moved to a dry, climate-controlled space. Photograph and inventory everything before it moves. Electronics in particular need quick attention — water damage can be fixable in the first hours but becomes terminal within days. For specifics on protecting electronics during the restoration window, see our guide on protecting electronics and hardware during water damage restoration.
Targeted Cleaning and Antimicrobial Application
Once standing water is gone and unsalvageable materials are out, what remains needs to be thoroughly cleaned. The work goes in a specific order: HEPA-filtered vacuuming first to capture loose debris without spreading contaminants, then detergent and agitation to lift soils from porous and semi-porous surfaces.
After cleaning, an EPA-registered antimicrobial gets applied to inhibit bacterial and mold growth during the drying phase. This isn’t optional — between water contact and complete drying, microbial growth is the biggest threat to your home and your health. Different surfaces need different products and dwell times, and pros know which is which. They’ll also rinse-extract residues so you’re not left with chemical buildup as the area dries.
Strategic Drying With Air Movers and Dehumidifiers

Drying is where most DIY water cleanups go wrong. Setting up a fan in the corner doesn’t dry a soaked subfloor; it just dries the surface and traps moisture deeper. Professional drying uses a measured approach — calculate the volume of air, the moisture load, and the target moisture content for each material, then place equipment to hit those targets.
Low-profile air movers create fast, controlled airflow across wet surfaces, which speeds evaporation. Industrial dehumidifiers (LGR or desiccant types depending on conditions) capture the moisture before it can re-condense elsewhere. Together they create a controlled environment where things actually dry, instead of just spreading moisture around. Crews monitor humidity, temperature, and surface readings daily, adjusting equipment placement until target moisture levels are met.
Verification, Monitoring, and Final Moisture Readings
The restoration isn’t done when surfaces look dry. It’s done when measurements confirm dry. Daily monitoring should include surface moisture readings on all affected materials, ambient humidity and temperature, and dehumidifier output. A pro will set drying goals based on baseline readings from unaffected areas — when affected materials match the baseline, drying is complete.
Get final readings in writing. Documentation matters for insurance, for any future home sale disclosure, and as a guarantee that the work was actually done. If a restoration company won’t provide moisture documentation, find a different company.
Conclusion
Water damage is stressful in the moment, but the restoration process itself is well-defined when handled by a trained crew. The biggest factor in how much it costs and how much you lose is how fast you start — every hour the water stays in materials makes recovery harder. At Hydra Clean of Hattiesburg, MS, we provide professional water damage restoration backed by industry-standard procedures and equipment. Visit our water damage restoration service page to learn more, or call us at (601) 336-2411 — day, night, or weekend. We’ll help you get your home dry and healthy again.